Recent comments in /f/DIY
michkbrady2 t1_j9dghu2 wrote
Reply to How do I find these g-d studs?? by WaterChestnutII
Folks, I have been lurking for years, watching all the fabulous DIY on various streams ... thought to meself, I could give that a go ... and discovered that, in Dublin, walls are solid. So, the electric drill doesn't do what is necessary (as in I have 2mm to 5mm deep holes fecken everywhere in me gaff) ... All & every piece of advice would be appreciated. No banana for scale I'm afraid, you'll have to work out just how "deep" those measurements are please
shalafi71 t1_j9dgabi wrote
Reply to comment by porcelainvacation in How do I find these g-d studs?? by WaterChestnutII
LOL, my house has both. Drove me nuts trying to hit in my outdoor closet (interior wall).
Inshpincter_Gadget t1_j9dg2bj wrote
Reply to Questions on a shed gravel foundation . by Camarofeind
Agree with Tkajohn that you need to go down to bare dirt.
Use redwood stakes to secure your perimeter foundation "sleepers" (the 4x4's) in place. You can sister one of those stakes across the butt joint. Or just use a flat nail plate or tie plate. I'm not quite sure if the stakes or a nail plate (or any other hardware) would properly counteract the outward pressure of the gravel over time (like how a cardboard box full of wet sand wants to bow out the sides of the box). I suggest adding another 4x4 across the floor plan of the shed at that point, then use one bigass tie plate at the three-way joint where they all meet (like if there were two monkeys pushing your sleeper butt joints apart, you can just tie their tails together to cancel their forces). Clear as mud, right? Um, okay, have you seen those picnic baskets that Yogi bear likes and they have two lids that hinge in the middle? I am suggesting that your sleepers are like the rim of the picanic basket, and that you should add the piece that goes across the middle (where the lid hinges connect) to tie across the long sides.
Save yourself HOURS of fucking around to level your sleepers by purchasing 6 bags of construction sand. Dig a 5" wide trench (with your dirty pickaxe) where the sleepers will sit, then fill with an inch or more of sand. Smoothly smoothy-smooth the sand to make a level bed for your sleepers. As you level the bed, and you hit some dirt that you didn't quite get out of the way, then use your thinking brain to resist the urge to level that dirt. Scrape that crap out of the way immediately with the claw side of your dirty hammer. Take out a little extra. Then just put in some more of that sweet sweet construction sand. Smooooooooth it out like a dream baby.
Before you even start digging, you can temporarily build or place your sleepers where they will go. Use your new four foot level* to find your low spot. That's where you must dig the least. The high spot is where you must dig the most. Yes, this is highly technical shit here. Hang on to your girdle cuz now we're gonna get real crazy:
Move your temporarily connected rectangle shaped sleeper agglomeration about 6" diagonally sideways away from where it actually belongs. Use a bunch of old stakes, plywood scraps, used Earth, Wind, and Fire 8 tracks, and whatever other flat garbage you have around to Shim Your Foundation to be Truly Level. Also, use your new FATMAX 16' tape measure to measure across the diagonals and make sure your sleeper building footprint shape is Truly Square. To paint a picture, your shed foundation will be sort of floating above the ground, sort of right next to where it needs to be. Congratulations! You can tell exactly where to dig-- it's right next to those floaty boards! You can tell how deep to dig-- measure from the top of your foundation down to the bottom of your hole the same distance all around. You can tell how high the top of your sand should be-- again, it will be the same measurement down from the top of sleeper all around.
Ok, that's cool that you can measure down to the sand, if you want to, but listen man... check this out, what ifffffff you screeeeed the sand? Have you ever heard of that shit, man? That's when you cut some boards with your milwaukee brushless cordless 6.25" circ saw-- and, like screw those fucken boards together all crafty like --- this might be like 3 fucken boards or something-- so that its like a measuring device to measure down to to the top of the sand, and then you slidey slide that device to actually smooth the top of the sand to the specific measurement you want. That is screeding. Screed your sand all around until the perfect flat top of your sand bed matches the perfect flat top of your sleepers.
If you have enough helpers then you can just all lift that foundation off it's shims and lay it onto its sand bed. Recheck diagaonals. Stake into place. Fill with gravel. Compact (you can do a passable job of compaction with just a frikkin 4x4 post. Don't buy that piece of shit 10x10 tamper with the wooden handle). Lay pressure treated plywood over compacted gravel. Use more nail plates / tie plates to fasten all the plywood together.
Then build your shed.
*your hardware store has a bunch of levels for sale. Some of them are accurate! An accurate level will read the same when you flip it over, or when you flip it end for end. If you check five levels for accuracy you will probably find 3 that are accurate for level. Then check the two bubbles for vertical! It takes 15 minutes to find a good level.
If you don't stand your 4' level against the wall then it can't fall down. Lay your beautiful blue Empire level flat on the ground after you use it.
piroso t1_j9dfd2p wrote
Reply to How do I find these g-d studs?? by WaterChestnutII
It's 16" on center but you don't know which which end of the wall they started on. Maybe it was the other end. As others have said 24" on center can also be a thing.
Are the walls lathe and plaster? Because if so that might be why it's hard to find the studs and stud finders are working..
fujiko_chan t1_j9degd7 wrote
Reply to comment by pinacolada12345 in How do I find these g-d studs?? by WaterChestnutII
I have small but very strong magnets for my fridge, and they will stick to nails/screws in drywall. Easy and non-electronic way to find studs.
Educational-Fig-2330 t1_j9deeeo wrote
Reply to How do I find these g-d studs?? by WaterChestnutII
My last house was apparently built by a fun-loving rag-tag band of beer drinking, pot smoking misfit miscreants pulled off the streets and handed hammers to meet booming demand for new housing in the 70s. If your house was built by the same ilk, your studs might not be any consistent number "on center." I had some studs 8" apart and some 4ft apart. Hidden behind caulk and new layers of paint, you would find perforated lines between 1ft and 3ft long where I went in hammering in a brad nail every 1/2" until I found stud. My studs might be 24" apart at the top and 19" apart at the bottom or vise versa. Not a single thing was straight, plumb, or level. Inside the walls we found beer cans and roaches (not insects).
Deftek178 t1_j9de346 wrote
Reply to comment by pinacolada12345 in How do I find these g-d studs?? by WaterChestnutII
Magnet style stud finder is the first one I bought when I got my first apartment. 20 years later and I've never bought or even considered getting another studfindee. This is the only way to do it in my opinion. My last dog chewed up the studfinder when she was a puppy so it's covered in little holes but it still works like the day I bought it.
danarexasaurus t1_j9de0r7 wrote
Reply to How do I find these g-d studs?? by WaterChestnutII
Get yourself a nice rare earth magnet. It was a game changer for me in my plaster and lathe house
bemenaker t1_j9de091 wrote
Reply to comment by CGNYC in How do I find these g-d studs?? by WaterChestnutII
12 inch spacing was a standard in carpentry. 16 is the norm now. 8 is not.
Edit so was 24 I believe 24 requires 2x6s instead of 2x4s
xpen25x t1_j9ddj6h wrote
Reply to How do I find these g-d studs?? by WaterChestnutII
find an outlet and the stud finder should find the stud on either side. measure 16 in and check then measure 24 inches and check.
Repulsive_Coat_3130 t1_j9ddeky wrote
Reply to How do I find these g-d studs?? by WaterChestnutII
Check the YMCA, usually a few there
Huskies971 t1_j9ddehz wrote
Reply to comment by TechE2020 in For OCD-level drywall repair, what details are important? by gluon713
That was the first time I ever skim coated with a roller and the tutorial i found used a squeege so I went that route. I found it easy just have to work quick cause it drys super fast.
nhorvath t1_j9dd5b9 wrote
Reply to comment by [deleted] in What device can draw steady electricity load and deliver intermittent loads ? by [deleted]
The max /peak of a generator nameplate is a motor starting rating. Less than a second burst. You need a bigger generator.
[deleted] t1_j9dd47i wrote
Reply to comment by Vyzantinist in Attaching TV wall mount - how to avoid electrical wiring in the walls? by Vyzantinist
[deleted]
TemporaryPackage4475 t1_j9dcyef wrote
Reply to comment by Vyzantinist in Attaching TV wall mount - how to avoid electrical wiring in the walls? by Vyzantinist
Even better! Building materials were bigger then lol
PS - My place is 1920 old :) anyways a fun adventure doing work around here
Vyzantinist OP t1_j9dcnet wrote
Reply to comment by [deleted] in Attaching TV wall mount - how to avoid electrical wiring in the walls? by Vyzantinist
My apartment is like 1950s old. There's lead in the wall paint lol.
Vyzantinist OP t1_j9dcle7 wrote
Reply to comment by Gonzostewie in Attaching TV wall mount - how to avoid electrical wiring in the walls? by Vyzantinist
It would be above/near plug sockets.
not_another_drummer t1_j9dch3q wrote
Reply to comment by twowheeltech in How do I find these g-d studs?? by WaterChestnutII
16" on center might not have been code in that area back in 1939 when lumber was rough cut 2" by 4" . Also, I expect some of the house may have settled in the last 83 years.
Intelligent_Ebb4887 t1_j9dcgax wrote
Reply to comment by Vyzantinist in Attaching TV wall mount - how to avoid electrical wiring in the walls? by Vyzantinist
If you're mounting above an outlet, then the wires could run along the edge of a stud. In that case, if you hit the electrical, you did a bad job of mounting the TV mount.
Or, they will drill holes through the middle of studs to feed the electrical horizontally. Typically from outlet to outlet (no worries there since you aren't mounting the TV that low). Or from switch to outlet (on the same wall, it would typically go down to outlet level and then horizontal).
So, if you can determine the center of a stud and drill a hole in the center, it's not likely that you're going to hit electrical. Now, there's a chance that a crazy person did something other than stated above (I've experienced it) and hopefully they put a metal plate on the stud so that you can't accidentally drill into it.
[deleted] t1_j9dc3xc wrote
Reply to comment by TemporaryPackage4475 in Attaching TV wall mount - how to avoid electrical wiring in the walls? by Vyzantinist
[deleted]
famous_shaymus t1_j9dbvc5 wrote
Reply to How do I find these g-d studs?? by WaterChestnutII
Find a patch of a couple feet wide in the general area that you’re wanting to find a stud. Use a finger knuckle to tap on the wall noting the tone that’s made. Move laterally in one direction, continuing to tap the wall. As you get closer to a stud, the tone should get shorter and slightly higher. As you move away from a stud, the tone gets deeper. This method will get yah relatively close to a stud. Then, in an area that’s less conspicuous, maybe near the floorboard, use a small finishing nail to tap into the wall. If it pops through easily, no stud; keep moving in one direction about an inch and a half laterally from the original hole. If you’ve gone maybe 6-8 inches in one direction and by the tone you can tell you’re going in the wrong direction, just pop back to the other side of your original hole and move in that direction.
Graflex01867 t1_j9dbugk wrote
Reply to comment by Camarofeind in Questions on a shed gravel foundation . by Camarofeind
Ahh, I misunderstood your foundation plan. My mistake - I thought you were using 2 4x4s on top of each other.
I would just buy a pressure treated 2x4, cut it in half, and screw half of it to the bottom of the 4x4s and half of it to the inside of the 4x4s. If your gravel is nice and packed/tamped under the wood, it shouldn’t move/bend.
Zeddica t1_j9dbohd wrote
Reply to comment by Vyzantinist in Attaching TV wall mount - how to avoid electrical wiring in the walls? by Vyzantinist
Don’t hit close to the stud, hit the actual stud.
And most of the time the electrical wiring is loose enough it just nudges out of the way.
TemporaryPackage4475 t1_j9dbog1 wrote
Reply to comment by Vyzantinist in Attaching TV wall mount - how to avoid electrical wiring in the walls? by Vyzantinist
Yes, but there aren't that many wires in your wall, and chances of hitting one are close to zero if you're trying to hit studs to hang a TV mount. Diagram
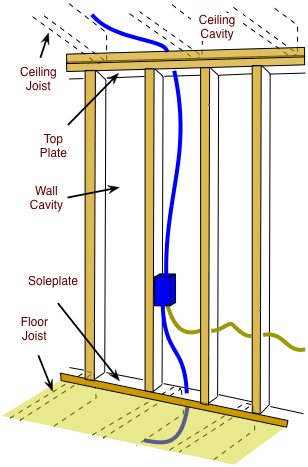
Figure you have 3/8" drywall on 2x4 studs... The electrician would have put any wires halfway back on the stud or further - so your lag screw would have to penetrate the wall 1 5/8" just to reach where a wire might be, and pierce layers of plastic and paper protective sheathing perfectly to cause a problem. And IF there was a problem, the breaker would trip before causing any real harm.
No_Bass_9328 t1_j9dgnd3 wrote
Reply to Ceramic tile over ceramic tile. by TooRational101
The last bathroom I tiled over tile, I just scrubbed the tile well then tiled over. It is in one of my rental units. It has held up all well for nearly 6 years so far. Not necessarily recommending just giving that experience. Cost was a issue.